
Introduction
In the modern era, daily life has become increasingly sedentary. People spend extended hours sitting at desks, studying, commuting, or scrolling on digital devices. This inactive lifestyle contributes to a Widespread Issue: tight hips and restricted mobility.
When your hips become stiff, it doesn’t just create mild discomfort—it can trigger a chain reaction throughout the body. Many individuals experience:
- Persistent lower back discomfort
- Poor alignment and posture
- Reduced flexibility and range of motion
- Decreased athletic efficiency and performance
This is exactly where the Frog Yoga Pose (Mandukasana) becomes exceptionally effective.
Unlike simple stretches that only target surface-level muscles, this posture delivers a profound and penetrating stretch. It works deeply into the inner thighs, groin, and pelvic region—areas where the body accumulates both physical tightness and emotional tension.
Initially, the pose may feel intense or even slightly overwhelming. However, with regular and mindful practice, it can:
- Dramatically improve flexibility
- Enhance posture and alignment
- Increase joint mobility
- Reduce chronic discomfort and stiffness
In this comprehensive 2026 guide, you will explore everything—from detailed instructions and anatomical insights to modifications, errors, and advanced techniques.
What Is Frog Yoga Pose (Mandukasana)?
Frog Yoga Pose, commonly referred to as Mandukasana, is a deep hip-opening posture that emphasizes stretching and releasing the inner thigh region.
In this pose:
- Knees are positioned wide apart
- Hips gradually move backward and downward
- The inner thighs experience an intense stretch
The posture visually resembles a frog, which is why it is given this name.
Common Yoga Styles That Use Frog Pose
Frog Pose is integrated into multiple yoga traditions due to its powerful effects:
- Yin Yoga → Long, passive holds (1–3 minutes) for deep tissue release
- Hatha Yoga → Slow and controlled movements for flexibility
- Vinyasa Yoga → Fluid transitions within dynamic sequences
Key Purpose of Frog Pose
The primary goals of practicing this posture include:
- Opening tight hip joints
- Stretching inner thigh muscles (adductors)
- Enhancing pelvic mobility
- Releasing deeply stored tension
Muscles Targeted in Frog Yoga Pose
Frog Pose is not merely a stretch—it functions as a deep fascial release technique that impacts multiple muscle groups.
Primary Muscles
- Adductors (inner thighs)
- Groin muscles
- Hip flexors
Secondary Muscles
- Glute muscles (for stabilization)
- Core muscles (for support and balance)
- Lower back muscles
Fascia Impact
This posture significantly influences the fascia, which is the connective tissue surrounding muscles.
Because of this:
- Flexibility improvements are long-lasting
- Deep-seated tension is released
- Mobility increases progressively over time
Top Benefits of Frog Yoga Pose (Mandukasana)
1. Deep Hip Opening
This posture effectively releases accumulated stiffness caused by prolonged sitting. It enhances hip flexibility and allows movement to feel smoother and more natural.
2. Improves Flexibility
By elongating tight muscle fibers, Frog Pose increases overall flexibility and expands your range of motion.
3. Relieves Lower Back Pain
Tight hips often place unnecessary strain on the lower back.
Frog Pose helps alleviate this by loosening hip flexors and reducing spinal pressure.
4. Boosts Blood Circulation
The stretch promotes improved blood flow in the hips and legs, supporting muscle recovery and tissue health.
5. Reduces Stress & Emotional Tension
The hips are often referred to as storage areas for emotional stress.
Deep stretching can:
- Release emotional buildup
- Calm the nervous system
- Promote relaxation
6. Supports Digestion
Gentle Compression in the abdominal region stimulates internal organs and enhances digestion over time.
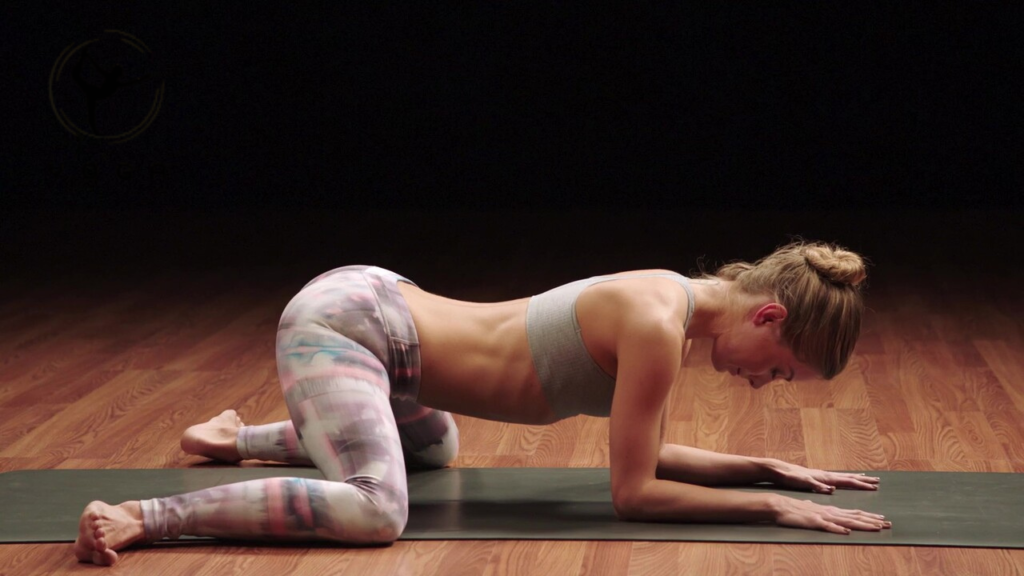
Step-by-Step Guide: How to Do Frog Yoga Pose Correctly
Beginner-Friendly Instructions
Follow these steps carefully for safe and effective practice:
- Begin in a tabletop position (hands and knees)
- Slowly widen your knees apart
- Ensure ankles remain aligned with knees
- Slightly turn your feet outward
- Gradually move your hips backward and downward
- Lower your upper body onto your forearms or chest
- Maintain a neutral spine
- Hold the position for 5–10 breaths
Always move gently and avoid sudden movements.
Frog Pose Step Breakdown Table
| Step | Action | Key Tip |
| 1 | Tabletop position | Lightly engage your core |
| 2 | Widen knees | Move gradually |
| 3 | Align ankles | Prevent twisting |
| 4 | Lower hips | Stay controlled |
| 5 | Rest the upper body | Use forearms |
Proper Form & Alignment (Very Important)
Correct alignment ensures safety and maximizes effectiveness.
Alignment Checklist
- Knees aligned with hips
- Ankles aligned with knees
- Spine remains neutral (not overarched)
- Hips move backward
- Core remains gently engaged
Golden Rule
Never force the stretch.
Flexibility develops progressively with consistency—not pressure.
Breathing Technique for Better Results
Breathing plays a crucial role in deep stretching.
How to Breathe
- Inhale: Expand your abdomen
- Exhale: Gently sink deeper into the pose
Pro Tip
Use slow nasal breathing to relax muscles and reduce discomfort.
Frog Yoga Pose Variations (Beginner to Advanced)
Beginner Variations
- Half Frog Pose (one leg at a time)
- Supported Frog Pose (use cushions or yoga blocks)
Intermediate Variation
- Classic Frog Pose (Mandukasana)
Advanced Variations
- Dynamic Frog (rocking forward and backward)
- Deep Yin Frog (holding for 2–3 minutes)
- Bhekasana (backbend variation)
Common Mistakes to Avoid in Frog Pose
1. Forcing Knees Too Wide
This can strain ligaments and lead to injury
2. Dropping Hips Too Quickly
Causes unnecessary muscle stress
3. Ignoring Pain Signals
Discomfort is acceptable, pain is not
4. Skipping Warm-Up
Increases risk of injury
5. Poor Foot Alignment
Twisting feet can damage knees
Safety Tips for Safe Practice
- Always perform a proper warm-up (lunges, hip openers)
- Use cushions or props for support
- Begin with shorter durations (20–30 seconds)
- Practice on a soft surface
- Stop immediately if sharp pain occurs
Contraindications: Who Should Avoid Frog Pose
Avoid or modify this posture if you have:
- Knee injuries
- Hip joint problems
- Groin strain
- Recent surgical Procedures
Consult a professional if unsure.
Beginner Tips for Faster Progress
- Start slowly and be patient
- Use supportive props
- Focus on breathing rather than depth
- Practice consistently (3–4 times per week)
- Avoid comparing yourself to others
Duration & Frequency Recommendations
| Level | Duration | Frequency |
| Beginner | 20–30 seconds | 3x/week |
| Intermediate | 1–2 minutes | 4–5x/week |
| Advanced | 2–3 minutes | Daily |
Yoga Philosophy Behind Frog Pose
From a traditional perspective, the hips are believed to store:
- Emotional tension
- Stress
- Blocked energy
Practicing Frog Pose helps:
- Release emotional burdens
- Open energy channels
- Create grounding and stability
Scientific Benefits of Frog Yoga Pose
Modern research supports deep stretching practices like Frog Pose:
- Enhances muscle elasticity
- Improves joint mobility
- Reduces injury risk
- Promotes better posture
Consistency is key to achieving lasting results.
Diet Tips to Improve Flexibility Faster
What to Eat
- Magnesium-rich foods (spinach, nuts)
- Anti-inflammatory foods (berries, turmeric)
- Healthy fats (avocados, seeds)
Hydration
Drinking sufficient water helps:
- Improve tissue elasticity
- Prevent stiffness
How to Add Frog Pose to Your Routine
Sample Home Routine
- Lunges – 1 minute
- Butterfly Pose – 1 minute
- Frog Pose – 1–2 minutes
- Child’s Pose – cool down
Frog Pose vs Other Hip Openers
| Pose | Difficulty | Target Area |
| Frog Pose | Medium–Hard | Deep hips & groin |
| Butterfly Pose | Easy | Inner thighs |
| Pigeon Pose | Medium | Hip flexors |
Pros & Cons of Frog Yoga Pose
Pros
- Deep hip opening
- Rapid improvement in flexibility
- Relief from lower back discomfort
- Enhanced mobility
Cons
- Intense for beginners
- Risky without proper alignment
- Not suitable for knee injuries
FAQs
Yes, but beginners should:
Use props
Avoid going too deep
5–10 breaths (basic)
Up to 3 minutes (Yin Yoga)
Because it deeply stretches:
Inner thighs
Hip joints
Not directly.
It improves mobility and metabolism, but is not a fat-loss exercise.
Yes—if practiced gently with proper recovery.
Conclusion
The Frog Yoga Pose (Mandukasana) stands out as one of the most effective yet underestimated yoga postures.
Although it may feel demanding in the beginning, its long-term advantages are remarkable:
- Enhanced flexibility
- Improved posture
- Reduced physical discomfort
- Greater mobility and ease of movement
In a lifestyle dominated by prolonged sitting, this posture can significantly transform how your body functions and feels.
The key to success is simple:
- Stay consistent
- Move mindfully
- Focus on proper alignment
With patience and dedication, Frog Pose can become a powerful tool for achieving a healthier, more flexible, and pain-free body.